
Hi guys....new look on my blog. I did some changes here and there. I added horizontal menus, change the background, header, I also added link of beautiful blogs from wonderful and talented people around the world. I will continue to update the link if I find out new ones. So, welcome and hope you enjoy your ride here. And I hope you like my new blog appearance as much as I do :)
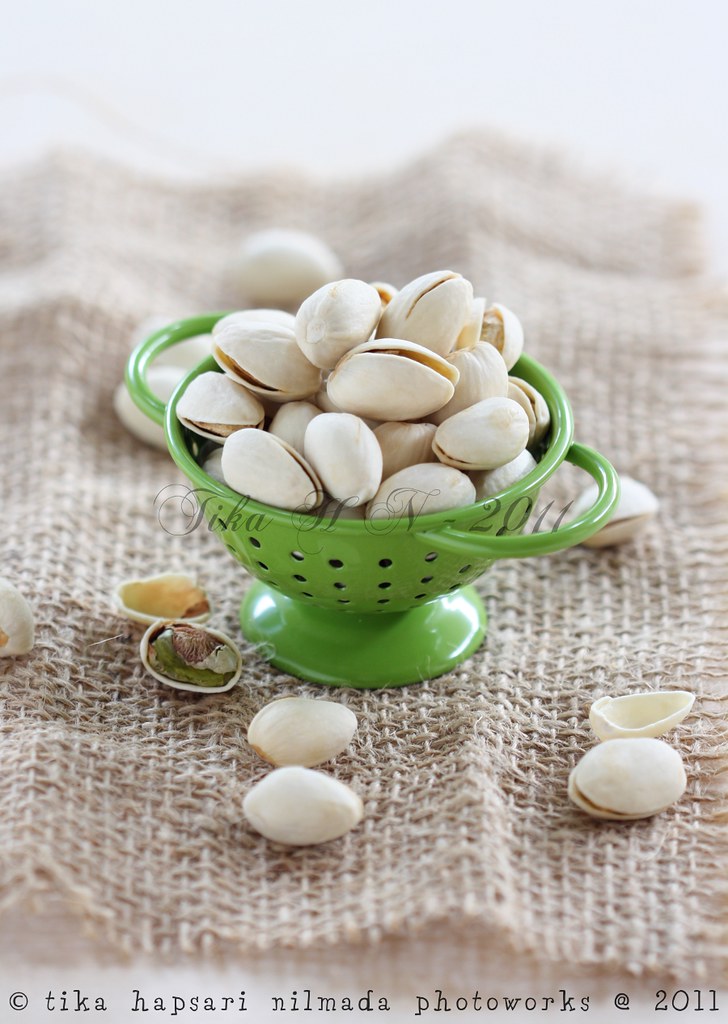
Do you see the picture above ? It has reached more than 300 viewers and more than 30 favorites on my Flickr in less than a week since the first time I uploaded it. I didn't expect that some of the viewers love this photo. And some of my friends love the colander :D (sssttt...I bought it on ACE Hardware).
Frankly speaking, I was looking for an idea with the pistachio. Right after this photo being uploaded, Aisha Yusaf (my dear Flickr friend) offered me the recipe of biscotti. What a nice coincidence :D The following week, I insisted to make it. I want to serve this for tea time on the weekend. But good intention is not always enough.
My handmixer suddenly stopped working while I was beating the butter and sugar. Oh nooo....I just started ! Maybe this is one of a cook's nightmare. But finally I could managed everything back on track (you don't want to know what I have used to mix the mixture :D and I won't tell you either, hahaha...shame on me !)
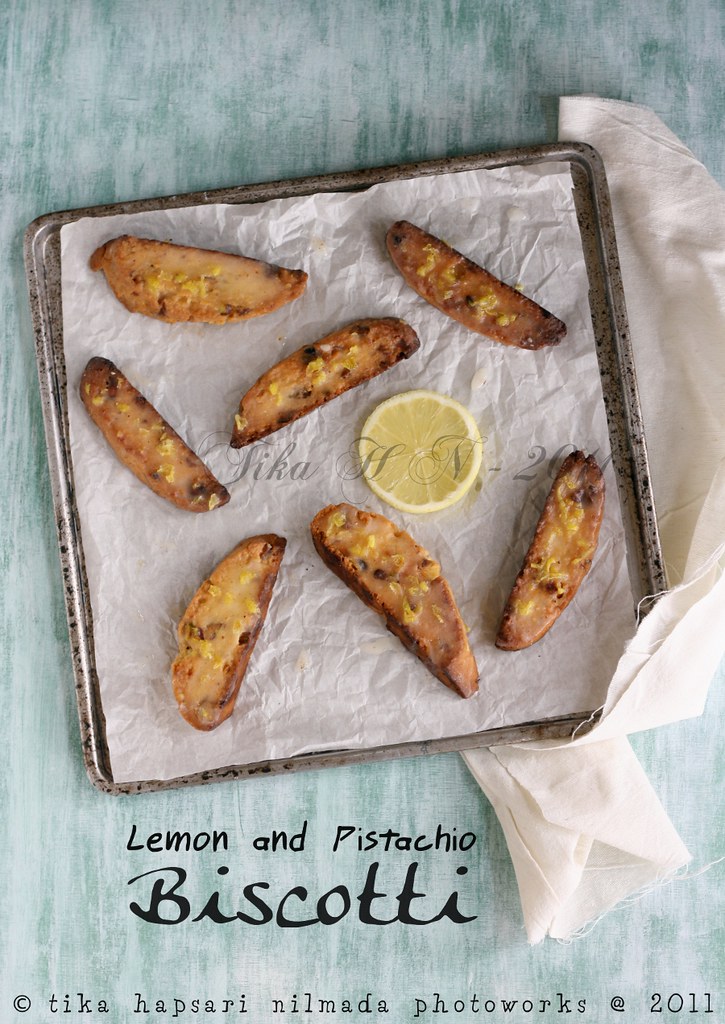
But my nightmare was not over yet ! I set the oven temperature too high and also forgot to line the baking tray with parchment paper. Bad..bad..bad... !! So you can see, my burnt biscottis. It tastes good though :p (Aisha ... I promise to make it again and I'll make it in a good and pretty shape ! Promise).
I should tell you, "No, those aren't potato wedges !"
Lemon and Pistachio Biscotti
(a recipe from Aisha, written as what she wrote to me)
(a recipe from Aisha, written as what she wrote to me)
Ingredients :
- 6 tablespoons unsalted butter, at room temperature
- 1/2 cup granulated sugar
- 1 tablespoon grated lemon zest
- 2 large eggs
- 1 teaspoon vanilla extract
- 2 cups all-purpose flour
- 2 teaspoons baking powder
- 1/4 teaspoon salt
- 1 cup shelled pistachios, roasted and coarsely chopped
For the icing:
- 2 cups sifted powdered sugar
- 2-3 teaspoon grated lemon zest
- 1/4 cup lemon juice
How to :
1. Preheat oven to 350°F/180°C/Gas Mark 4. Line a baking tray with parchment paper.
2. In a large bowl, beat the butter, sugar and lemon zest until well blended. Add the eggs, one at a time, beating well after each addition. Stir in the vanilla.
3. In a small bowl, combine the flour, baking powder, and salt.
4. Add to the butter mixture and blend thoroughly. Stir in the nuts. (The dough will be soft.)
5. On a lightly floured work surface, divide the dough in half.
6. Lightly flour each piece and shape it into a log about 1 1/2" in diameter and 9" long. Place the logs about 3" apart on the baking tray.
7. Press each log down to make it about 3/4" thick and 3" wide.
8. Bake on the middle shelf of the oven until puffed and lightly browned on top, about 25-30 minutes.
9. Remove from the oven and let them cool for 10 minutes on the tray.
10. Carefully slide the logs onto a work surface. Using a long, sharp knife, cut each log crosswise into 3/4" thick slices. (Make each cut with a single swipe of the blade. Don't use a sawing motion, which will break the biscuits.)
11. Place the slices cut side down on the baking sheet (can be touching to fit them all on the sheet).
12. Bake on the middle shelf for about 8 minutes.
13. Remove from the oven, turn the biscuits over and bake for another 8 minutes till golden. (Keep an eye on them, you don't want them to burn.)
14. Immediately transfer them onto a wire rack to cool completely.
To make the icing:
1. In a small bowl, combine the powdered sugar, lemon zest, and lemon juice and beat until smooth. Beat in additional drops of lemon juice if necessary to make an icing that will coat the biscotti lightly.
2. Dip one whole side of the biscotti in the icing (you just want one side dipped in the icing not both.)
3. Place on a wire rack icing facing up until the icing sets.
4. Store in an airtight container.
Enjoy....
Those biscotti look so good! What a marvelous falvor combo.
ReplyDeleteCheers,
Rosa
I like so much :)
ReplyDelete